Showing posts with label php. Show all posts

Wednesday, September 15, 2010

All about CRONTAB


What is Crontab?

Crontab (CRON TABle)is a program that manipulates the CRON daemon, making it easy for users to schedule task and run programs/commands at pre determined periods of time. Crontab can also be considered a file witch contains commands that will be run by the system as the user that owns the crontab file.

What is the purpose of Crontab?

Cron is designed to maintain a list of commands that the system needs to run at a given time interval.
For example if you have a script that generates statistics and needs to be run every couple of hours or everyday cron can do it for you. Or for example if you have a script that sends a newsletter every month you can use cron to run the script that sends the newsletter every month or week.

Crontab commands

When your logged in to your server you can use program cron using the following commands:
  • crontab -l
    Lists the current cron jobs
  • crontab -e
    Edit your current crontab file and ad/remove/edit crontab tasks.
  • crontab -r
    Remove the crontab file.
  • crontab -v
    Displays the last time you edited your crontab file.

The crontab file – components of crontab

When you enter the edit mode (crontab -e) and start adding tasks to your cron file you need to consider the following syntax:
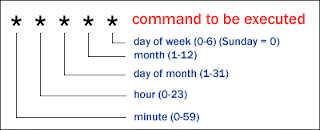
crontab syntax
Cron Structure

The asterisk (*) symbolizes that every instance of that field (i.e. every minute, hour, day, month, weekday) will be used in the command.

Example on how to setup your first crontab

Lets say you have a script named run-me.sh located in /home/your_username you want to run every day at 13:30. You will need to login your server console and input the following commands:
  • crontab -e
    This will open the crontab file and let you edit it. By default this file will be opened with the VI editor and you will need to press the “Insert” key on your keyboard to be able to write in that file.
  • 30 13 * * * /home/your_username/run-me.sh >/dev/null 2>&1
    The first character you see is “30” this means that crontab will run the script every  time the clock hits the 30 minutes mark. Next “13” this means that crontab will run the script when the clock hits 13. The next three * tell crontab to run the script every day, of every month of every weekday. Combining these fields crontab will run the script every day at exactly 13:30. You may notice that we added the “>/dev/null 2>&1” string at the end of the command. The default cron job will always send and e-mail to the root account when ever a command is executed. Now you don't want to be notified every day that your crontab job has been executed. If you don't want to receive e-mails every day notifying you about your job's execution place this “>/dev/null 2>&1” at the end of every instance of every crontab command.
When you are finished adding your commands to the crontab file you need to save and exit. If you are using VI as your editor you need to issue the following commands:
  • Press the Esc (Escape key) on your keyboard to enter the command mode of VI
  • After you pressed Escape then type the following characters :wq! and press Enter. Remember you have to type this characters (remove the quotes): “:wq!”.
 

Now to list your crontab job just issue the following command: crontab -l

 
If you need to ad another crontab job or even more all you need to do is follow the same steps as above and just ad another line to the file.
REMEMBER: Every crontab job needs to be placed on its own line in the file and after the last line you need to insert a non-braking character (press Enter).
The crontab syntax goes a little beyond its boundaries and has more advance meaning for some users.
For example if you wish to use more then one instance of one column you will separate those instances by a comma “,” or if you wish to use a time period lets say for example from Sunday till Tuesday you will use dash “-”.

10,20,30 13 * * 0-2 /home/your_username/run-me.sh >/dev/null 2>&1

This crontab job will run your scrip “run-me.sh” on from Sunday until Tuesday13:10, 13:20 and 13:30. Remember there are no spaces between values separated by commas “,” and neither in dashes “-”. There is also an operator that some versions of cron support called the slash operator “/” that can be used to skip a given number of values in your jobs. (Sunday, Monday, Tuesday) at

Crontab examples - cron examples

The syntax of crontab is not very easy to understand from the start and the best way of understanding is from examples:

Run the script every day at 12:00.

0 12 * * * /home/your_username/run-me.sh >/dev/null 2>&1
 

Run the script every day at 12:00, 14:00 and 16:00.

0 12,14,16 * * * /home/your_username/run-me.sh >/dev/null 2>&1
 

Run the script every Sunday at 13:30.

30 13 * * 0 /home/your_username/run-me.sh >/dev/null 2>&1
 

Run the script every Saturday at 12:00, 14:00 and 16:00.

0 12,14,16 * * 6 /home/your_username/run-me.sh >/dev/null 2>&1
 

Run the script on the first, fifteenth and twentieth of every month.


0 0 1,15,20 * * /home/your_username/run-me.sh >/dev/null 2>&1
 

Run the script every day from 3 to 3 hours: 00:00, 03:00, 06:00 etc.

0 */3 * * * /home/your_username/run-me.sh >/dev/null 2>&1


Original: http://www.tutorial5.com/content/view/95/51/

Show all errors in PHP

<?php
ini_set('error_reporting', E_ALL);
ini_set('display_errors', 'On');
ini_set('display_startup_errors', 'On');
?>

For MySQL errors: echo mysql_errno($conn) . ": " . mysql_error($conn);

Thursday, September 2, 2010

Random Float in PHP

<?php
function random_float ($min,$max) {
   return (
$min+lcg_value()*(abs($max-$min)));
}
?>


Random numbers with Gauss distribution (normal distribution)
<?php

function gauss()
{  
// N(0,1)
    // returns random number with normal distribution:
    //   mean=0
    //   std dev=1
   
    // auxilary vars
   
$x=random_0_1();
   
$y=random_0_1();
   
   
// two independent variables with normal distribution N(0,1)
   
$u=sqrt(-2*log($x))*cos(2*pi()*$y);
   
$v=sqrt(-2*log($x))*sin(2*pi()*$y);
   
   
// i will return only one, couse only one needed
   
return $u;
}

function
gauss_ms($m=0.0,$s=1.0)
{  
// N(m,s)
    // returns random number with normal distribution:
    //   mean=m
    //   std dev=s
   
   
return gauss()*$s+$m;
}

function
random_0_1()
{  
// auxiliary function
    // returns random number with flat distribution from 0 to 1
   
return (float)rand()/(float)getrandmax();
}

?>


Other versions of Gauss Distribution
<?php
function gauss($algorithm = "polar") {
   
$randmax = 9999;
   
    switch(
$algorithm) {
       
       
//polar-methode by marsaglia
       
case "polar":
           
$v = 2;
            while (
$v > 1) {
               
$u1 = rand(0, $randmax) / $randmax;
               
$u2 = rand(0, $randmax) / $randmax;

               
$v = (2 * $u1 - 1) * (2 * $u1 - 1) + (2 * $u2 - 1) * (2 * $u2 - 1);
            }
           
            return (
2* $u1 - 1) * (( -2 * log($v) / $v) ^ 0.5);
       
       
// box-muller-method
       
case "boxmuller":
            do {
               
$u1 = rand(0, $randmax) / $randmax;
               
$u2 = rand(0, $randmax) / $randmax;                   
               
               
$x = sqrt(-2 * log($u1)) * cos(2 * pi() * $u2);
            } while (
strval($x) == "1.#INF" or strval($x) == "-1.#INF");
           
           
// the check has to be done cause sometimes (1:10000)
            // values such as "1.#INF" occur and i dont know why
           
           
return $x;

       
// twelve random numbers  
       
case "zwoelfer":
           
$sum = 0;
            for (
$i = 0; $i < 12; $i++) {
               
$sum += rand(0, $randmax) / $randmax;
            }
            return
$sum;
     }      
}
?>

Thursday, August 5, 2010

PHP isEmail Function


Code to validate email in PHP using Preg Match.
This will cover emails of format:
asdfasdf@asdfasdf.com

function isEmail($email)
{
      if(preg_match("~([a-zA-Z0-9!#$%&amp;'*+-/=?^_`{|}~])@([a-zA-Z0-9-]).([a-zA-Z0-9]{2,4})~",$email)) 
        return true;
   else
        return false;
}

Saturday, March 27, 2010

Upgrade to PHP 5.2.10 - CentOS5 using YUM


There is a version of PHP (5.2.10) in CentOS’s Testing repository. You could either download each rpm and install, or set up your yum to install from the testing repository.
Install the testing repository’s GPG key:
rpm --import http://dev.centos.org/centos/RPM-GPG-KEY-CentOS-testing
And download the CentOS-Testing repo file:
cd /etc/yum.repos.d
wget http://dev.centos.org/centos/5/CentOS-Testing.repo
Now you can install/update to PHP 5.2.10 by running
yum --disablerepo=* --enablerepo=c5-testing update php

Monday, February 1, 2010

Recover Joomla Admin Password

To update Joomla Admin password, you need to run the following SQL query:
UPDATE `jos_users` SET `password` = md5('PASSWORD HERE') WHERE `jos_users`.`id` =62 LIMIT 1

This will simply update the password of user admin. This will work in all joomla versions. (I tried it myself)

Secondly, I was trying to enter a new user to Joomla DB. It need a different trick :P

First thing is simple add a new record to jos_users table.

Query will be:

INSERT INTO `jos_users` (`id`, `name`, `username`, `email`, `password`, `usertype`, `block`, `sendEmail`, `gid`, `registerDate`, `lastvisitDate`, `activation`, `params`) VALUES (NULL, 'Name', 'username', 'email', MD5('password_text'), 'Super Administrator', '0', '0', '25', '0000-00-00 00:00:00', '0000-00-00 00:00:00', '', '');


Just replace the password_text with password you need to set and put username, email and Name etc.

Now this is not it.

You need to add another record in jos_core_acl_aro table.

Query is:

INSERT INTO `jos_core_acl_aro` (`id`, `section_value`, `value`, `order_value`, `name`, `hidden`) VALUES (NULL, 'users', 'ID_FROM_LAST TABLE', '0', 'Name', '0');


ID_FROM_LAST_TABLE should be replaced with the ID returned in jos_users table for our record we entered in last query. Update Name too.

Now Finally, note down the ID from last query in core_acl_pro

and run following

INSERT INTO `jos_core_acl_groups_aro_map` (`group_id`, `section_value`, `aro_id`) VALUES (25, , 'ID_FROM_LAST TABLE');
Its done now. You can login with your new username and password.
---------------------------------

NOW about how Joomla generates its password. Actually if we see jos_users table in Joomla, we will notice a password with colons and stuff. The way joomla generates it is as follows:

$salt = JUserHelper::genRandomPassword(32);
$crypt = JUserHelper::getCryptedPassword("password", $salt);

$password = $crypt . ':' . $salt;


The return password will be the password used by Joomla.
---------------------------------
Passwords to be saved in DB:

Password  ::::::::::::::::: MD5
---------------------------------------------------------------------------
admin        ::::::::::::::::: 21232f297a57a5a743894a0e4a801fc3

password  :::::::::::::::: 5f4dcc3b5aa765d61d8327deb882cf99

Wednesday, December 9, 2009

POST data using cURL

This is about posting some data to a page via cURL. We already know the other and common method to post data, i.e. using a form and setting its method to POST. Sometimes we need to POST data using php without any form. So for this we can use cURL. 


Scenario: In our case we will send a user id along with a status and a message to our other page to process it and return it's result. We assume that we have a function called currentUserId() which will give us ID of current user and we will set status to 1. 


Explanation with code:

First we will get the ID of the user. We may use any method set the variable.

$id = currentUserId(); ////get user id
$status = 1; ///just a variable
$msg = 'Hello! I am here.';
 Now we will make an array of the fields which we are going to send
$fields = array(
    'id'=>$id,
    'status'=>$status, 
'msg'=>urlencode($msg)
);

Using urlencode will help to avoid problems because of html tags and stuff. Do include this when sending strings. It will convert spaces and other entities to url format like space is represented as %20 etc..

Now, to send data to external source we will need to convert our data to query string format. In query string, each different variable is separated by & sign and having 2 entities each, 1 for variable name and other for its value. In our case it should be like id=123&status=1&msg=Hello!%20I%20am%20here.
So for this we will use a foreach loop to convert our fields to query string.
foreach($fields as $key=>$value)  

    $fields_string .= $key.'='.$value.'&';  ///all elements to send with & sign in between as standard of query string
}  
rtrim($fields_string,'&'); ////remove extra & sign at the end ,,, we can use substr too


Now we will initiate the connection for curl and set options like url, number of vars and vars.

$con = curl_init(); //set options url, number of POST vars, POST vars  
curl_setopt($con ,CURLOPT_URL,$url);  
curl_setopt($con ,CURLOPT_POST,count($fields));  
curl_setopt($con ,CURLOPT_POSTFIELDS,$fields_string);

Now to send the vars, we need to execute curl using following function
$response= curl_exec($con);
The response from the page will in $response.

At the end we will close the connection.
curl_close($con);
COMPLETE CODE:::

$id = currentUserId(); ////get user id
$status = 1;
$msg = 'Hello! I am here.';  
$url = 'http://example.com/process-post.php'; ///URL where we are sending our data 
$fields = array(
    'id'=>$id,  
    'status'=>$status,  
    'msg'=>urlencode($msg)  
);  
//making query string for POST 
foreach($fields as $key=>$value) 
$fields_string .= $key.'='.$value.'&';  ///all elements to send with & sign in between as standard of query string
rtrim($fields_string,'&'); ////remove extra & sign at the end  
//initiate connection 
$con = curl_init();  
//set options url, number of POST vars, POST vars 
curl_setopt($con ,CURLOPT_URL,$url); 
curl_setopt($con ,CURLOPT_POST,count($fields)); 
curl_setopt($con ,CURLOPT_POSTFIELDS,$fields_string);  
//execute curl
$response= curl_exec($con);  
//close connection 
curl_close($con);

Developer Instincts