Okay so if you have an external drive with NTFS and you mount it on your Mac; you will have only READ access. To get a READ/WRITE access you need to install MacFUSE. Using MacFUSE you can extent the native file handling support and using 3rd party software you can have support for a number of different filesystems. It also comes with SDKs which will allow you to write custom sw on top of MacFUSE to extent the filesystem possibilities on Mac.
Just install the ntfs-3g, restart and there you go. Plug in ur external NTFS hdd. And check its permissions, those should be custom permissions; shouldn't be Read Only.
But here I had a problem, I was having this error:
NTFS-3G could not mount /dev/disk1s1
at /Volumes/CORSAIR because the following problem occurred:
/Library/Filesystems/fusefs.fs/Support/fusefs.kext
failed to load - (libkern/kext) link error; check the system/kernel
logs for errors or try kextutil(8).
the MacFUSE file system is not available (71)
SSH is a necessary tool in any server admin’s arsenal. It is the
main way you will be interacting with your servers whenever you are
performing system tasks such as install, updates, etc. SSH allows you
to remotely connect to your server and command it via the shell. Below
is a list of commands you will use commonly while working with your
server.
I prefer the popular SSH client Putty, but any SSH client will do.
Common SSH Commands or Linux Shell Commands,
ls : list files/directories in a directory, comparable to dir in windows/dos. ls -al : shows all files (including ones that start with a period), directories, and details attributes for each file.
cd : change directory · · “cd /home/username/” will navigate to /home/username/ directory cd ~ : go to your home directory cd - : go to the last directory you were in cd .. : go up a directory cat : print file contents to the screen
cat filename.txt : cat the contents of filename.txt to your screen
chmod: changes file access permissions
The set of 3 go in this order from left to right:
USER – GROUP – EVERONE
0 = — No permission
1 = –X Execute only
2 = -W- Write only
3 = -WX Write and execute
4 = R– Read only
5 = R-X Read and execute
6 = RW- Read and write
7 = RWX Read, write and execute
Usage:
chmod numberpermissions filename
chmod 000 : No one can access chmod 644: Usually for HTML pages chmod 755: Usually for CGI scripts
chown: changes file ownership permissions
The set of 2 go in this order from left to right:
USER – GROUP
chown root myfile.txt : Changes the owner of the file to root chown root.root myfile.txt : Changes the owner and group of the file to root
tail : like cat, but only reads the end of the file tail /var/log/messages : see the last 20 (by default) lines of /var/log/messages tail -f /var/log/messages : watch the file continuously, while it’s being updated tail -200 /var/log/messages : print the last 200 lines of the file to the screen
more: like cat, but opens the file one screen at a time rather than all at once more /etc/userdomains : browse through the userdomains file. hit Spaceto go to the next page, q to quit
pico : friendly, easy to use file editor pico /home/burst/public_html/index.html : edit the index page for the user’s website.
File Editing with VI ssh commands
vi : another editor, tons of features, harder to use at first than pico vi /home/burst/public_html/index.html : edit the index page for the user’s website.
Whie in the vi program you can use the following useful commands, you will need to hit SHIFT + : to go into command mode
:q! : This force quits the file without saving and exits vi :w : This writes the file to disk, saves it :wq : This saves the file to disk and exists vi :LINENUMBER : EG :25 : Takes you to line 25 within the file :$ : Takes you to the last line of the file :0 : Takes you to the first line of the file
grep : looks for patterns in files grep root /etc/passwd : shows all matches of root in /etc/passwd grep -v root /etc/passwd : shows all lines that do not match root
ln : create’s “links” between files and directories ln -s /usr/local/apache/conf/httpd.conf /etc/httpd.conf : Now
you can edit /etc/httpd.conf rather than the original. changes will
affect the orginal, however you can delete the link and it will not
delete the original.
last : shows who logged in and when last -20 : shows only the last 20 logins last -20 -a : shows last 20 logins, with the hostname in the last field
w : shows who is currently logged in and where they are logged in from. who : This also shows who is on the server in an shell.
netstat : shows all current network connections. netstat -an : shows all connections to the server, the source and destination ips and ports. netstat -rn : shows routing table for all ips bound to the server.
top : shows live system processes in a nice table,
memory information, uptime and other useful info. This is excellent for
managing your system processes, resources and ensure everything is
working fine and your server isn’t bogged down. top then type Shift + M to sort by memory usage or Shift + P to sort by CPU usage
ps: ps is short for process status, which is similar to the top command. It’s used to show currently running processes and their PID.
A process ID is a unique number that identifies a process, with that
you can kill or terminate a running program on your server (see kill
command). ps U username: shows processes for a certain user ps aux : shows all system processes ps aux –forest : shows all system processes like the above but organizes in a hierarchy that’s very useful!
touch : create an empty file touch /home/burst/public_html/404.html : create an empty file called 404.html in the directory /home/burst/public_html/
file : attempts to guess what type of file a file is by looking at it’s content. file * : prints out a list of all files/directories in a directory
du : shows disk usage. du -sh : shows a summary, in human-readble form, of total disk space used in the current directory, including subdirectories. du -sh * : same thing, but for each file and directory. helpful when finding large files taking up space.
wc : word count wc -l filename.txt : tells how many lines are in filename.txt
cp : copy a file cp filename filename.backup : copies filename to filename.backup cp -a /home/burst/new_design/* /home/burst/public_html/ : copies all files, retaining permissions form one directory to another. cp -av * ../newdir : Copies all files and directories recurrsively in the current directory INTO newdir
mv : Move a file command mv oldfilename newfilename : Move a file or directory from oldfilename to newfilename
rm : delete a file rm filename.txt : deletes filename.txt, will more than likely ask if you really want to delete it rm -f filename.txt : deletes filename.txt, will not ask for confirmation before deleting. rm -rf tmp/ : recursively deletes the directory tmp, and all files in it, including subdirectories. BE VERY CAREFULL WITH THIS COMMAND!!!
TAR: Creating and Extracting .tar.gz and .tar files tar -zxvf file.tar.gz : Extracts the file tar -xvf file.tar : Extracts the file tar -cf archive.tar contents/ : Takes everything from contents/ and puts it into archive.tar gzip -d filename.gz : Decompress the file, extract it
ZIP Files: Extracting .zip files shell command unzip file.zip
Firewall - iptables commands iptables -I INPUT -s IPADDRESSHERE -j DROP : This command stops any connections from the IP address iptables -L : List all rules in iptables iptables -F : Flushes all iptables rules (clears the firewall) iptables –save : Saves the currenty ruleset in memory to disk service iptables restart : Restarts iptables
Apache Shell Commands httpd -v : Outputs the build date and version of the Apache server. httpd -l : Lists compiled in Apache modules httpd status : Only works if mod_status is enabled and shows a page of active connections service httpd restart : Restarted Apache web server
MySQL Shell Commands mysqladmin processlist : Shows active mysql connections and queries mysqladmin drop databasenamehere : Drops/deletes the selected database mysqladmin create databasenamehere : Creates a mysql database
Restore MySQL Database Shell Command mysql -u username -p password databasename < databasefile.sql : Restores a MySQL database from databasefile.sql
Backup MySQL Database Shell Command mysqldump -u username -p password databasename > databasefile.sql : Backup MySQL database to databasefile.sql
kill: terminate a system process kill -9 PID EG: kill -9 431
kill PID EG: kill 10550
Use top or ps ux to get system PIDs (Process IDs)
EG:
PID
TTY
TIME
COMMAND
10550
pts/3
0:01
/bin/csh
10574
pts/4
0:02
/bin/csh
10590
pts/4
0:09
APP
Each line represents one process, with a process being loosely
defined as a running instance of a program. The column headed PID
(process ID) shows the assigned process numbers of the processes. The
heading COMMAND shows the location of the executed process.
Putting commands together
Often you will find you need to use different commands on the same
line. Here are some examples. Note that the | character is called a
pipe, it takes date from one program and pipes it to another. > means create a new file, overwriting any content already there. >> means tp append data to a file, creating a newone if it doesn not already exist. < send input from a file back into a command.
grep User /usr/local/apache/conf/httpd.conf |more This will dump all lines that match User from the httpd.conf, then print the results to your screen one page at a time.
last -a > /root/lastlogins.tmp
This will print all the current login history to a file called lastlogins.tmp in /root/
tail -10000 /var/log/exim_mainlog |grep domain.com |more This will grab the last 10,000 lines from /var/log/exim_mainlog,
find all occurances of domain.com (the period represents ‘anything’,
– comment it out with a so it will be interpretted literally), then send it to your screen page by page.
netstat -an |grep :80 |wc -l Show how many active connections there are to apache (httpd runs on port 80)
mysqladmin processlist |wc -l Show how many current open connections there are to mysql
Crontab (CRON TABle)is a program that manipulates the CRON daemon, making it easy for
users to schedule task and run programs/commands at pre determined
periods of time. Crontab can also be considered a file witch contains
commands that will be run by the system as the user that owns the
crontab file.
What is the purpose of Crontab?
Cron is designed to maintain a list of commands that the system
needs to run at a given time interval.
For example if you have a
script that generates statistics and needs to be run every couple of
hours or everyday cron can do it for you. Or for example if you have
a script that sends a newsletter every month you can use cron to run
the script that sends the newsletter every month or week.
Crontab commands
When your logged
in to your server you can use program cron using the following
commands:
crontab -l
Lists the current cron jobs
crontab -e
Edit your current crontab file and ad/remove/edit crontab
tasks.
crontab -r
Remove the crontab file.
crontab -v
Displays the last time you edited your crontab file.
The crontab file – components of crontab
When you enter the edit mode (crontab -e) and start adding
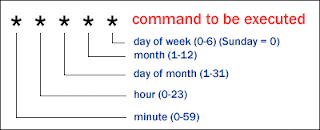
tasks to your cron file you need to consider the following syntax:
Cron Structure
The asterisk (*) symbolizes that every instance of that field (i.e.
every minute, hour, day, month, weekday) will be used in the command.
Example on how to setup your first crontab
Lets say you have a script named run-me.sh located in
/home/your_username you want to run every day at 13:30.
You will need to login your server console and input the following
commands:
crontab
-e
This will open the crontab file and let you edit it. By default this
file will be opened with the VI editor and you will need to press
the “Insert” key on your keyboard to be able to write in that
file.
30
13 * * * /home/your_username/run-me.sh >/dev/null
2>&1
The first character you
see is “30”
this means that crontab will run the script every time the clock hits the 30 minutes mark. Next
“13”
this means that crontab will run the script when the clock hits 13.
The next three *
tell crontab to run the script every day, of every month of every
weekday. Combining these fields crontab will run the script every
day at exactly 13:30. You may notice that we added the “>/dev/null
2>&1”
string at the end of the command. The default cron job will always
send and e-mail to the root account when ever a command is executed.
Now you don't want to be notified every day that your crontab job
has been executed. If you don't want to receive e-mails every day
notifying you about your job's execution place this “>/dev/null
2>&1”
at the end of every instance of every crontab command.
When you are finished
adding your commands to the crontab file you need to save and exit.
If you are using VI as your editor you need to issue the following
commands:
Press the Esc
(Escape
key) on your keyboard to enter the command mode of VI
After
you pressed Escape
then type the following characters :wq!
and
press Enter. Remember you have to type this characters (remove the
quotes): “:wq!”.
Now
to list your crontab job just issue the following command: crontab
-l
If
you need to ad another crontab job or even more all you need to do is
follow the same steps as above and just ad another line to the
file. REMEMBER:
Every crontab job needs to be placed on its own line in the file and
after the last line you need to insert a non-braking character (press
Enter).
The
crontab syntax goes a little beyond its boundaries and has more
advance meaning for some users. For example if you wish to use
more then one instance of one column you will separate those
instances by a comma
“,”
or if you wish to use a time period lets say for example from Sunday
till Tuesday you will use dash
“-”.
This
crontab job will run your scrip “run-me.sh”
on from Sunday
until Tuesday13:10,
13:20 and 13:30. Remember
there are no
spaces between values separated by commas
“,”
and
neither in dashes
“-”. There
is also an operator that some versions of cron support called the
slash operator “/” that
can be used to skip a given number of values in your jobs.
(Sunday, Monday, Tuesday) at
Crontab
examples - cron examples
The
syntax of crontab is not very easy to understand from the start and
the best way of understanding is from examples:
A compiled version of mostly used CSS hacks/filters used for Cross Browser Compatibility issues. (Ahh and yes the issues are always because of IE, more specifically a poor level of Standard Support in IE :P )
In the list below first 4 points are preferred. By preferred it doesn't mean to always use these. These hacks are only to be used when needed. For some of hacks it will not be a Valid CSS. So better use these with caution.
1. Conditional
SYNTAX:::
Positive
<!--[if condition]> HTML <![endif]-->
Negative
<!--[if !condition]><![IGNORE[--><![IGNORE[]]> HTML <!--<![endif]-->
condition is one of the following:
IE
For ALL versions of IE
lt IE version
IE versions less than version
lte IE version
IE versions less than or equal to version
IE version
Only specified version of IE
gte IE version
IE versions greater than or equal to version
gt IE version
IE versions greater than version
version is the version of Internet Explorer 5, 5.5, 6, or 7
NOTE: Versions of IE older than IE 5 don't support conditional comments, you may get unexpected results in those browsers.
NOTE: Versions of IE for MAC don't support conditional comments.
background: green !important; /* Major browsers other than IE 6 and below respect the importance immediately */
background: red; /* IE 6 and below use this value instead, even though the above was marked as important */
3. @import
@import "styles.css" all; imports the stylesheet in all major browsers except IE 7 and below. It may or may not work in future versions of IE.
4. body[class|="page-body"] {} selects the body element with the class page-body in IE 7 and all modern browsers except Opera 9 and below. It may or may not work in future versions.
5. _property: value and -property: value apply the property value in IE 6 and below. Warning: this uses invalid CSS.
6. *property: value applies the property value in IE 7 and below. It may or may not work in future versions. Warning: this uses invalid CSS
7. body:empty {} selects the body element in Firefox 1.5 and 2.0 only. It may or may not work in future versions. Warning: this uses invalid CSS 2.x but valid CSS 3 according to recent drafts.
8. >body {} selects the body element in IE 7 only. It may or may not work in future versions. Warning: this uses invalid CSS!
9. html* {} selects all descendants of the html element in IE 7 and below. It may or may not work in future versions. Warning: this uses invalid CSS!
10. The !ie identifier allows the property to be applied in IE 7 and below. It may or may not work in future versions. Warning: this uses invalid CSS!
11. The !important! identifier allows the property to be applied with importance in IE 7 and below and the property is not applied in other browsers. It may or may not work in future versions. Warning: this uses invalid CSS!
Thanks to http://www.webdevout.net/css-hacks. Please do visit it for details. I have changed a few things for easy understanding and quick reference.
In my case, my iphone just freezed. I got a message and iphone showed its preview and then suddenly hanged. The clock was running, so as other processes. Tried to turn it off, but of no use. Pressed home button alot of times, nothing happened. It wasn't even going to standby mode. So what is the solution? We have to manually restart the iphone now. In my case pressing the power button for long time didn't work too. So to reset you just have to press both HOME button and POWER/WAKE/SLEEP button together for for some time. This way iphone will restart.
You now have the Remi repository on your system, however it is disabled by default. Obviously you don’t want all of your packages been effected by this repository, however to enable it for a specific package, run the following:yum --enablerepo=remi update php
There is a version of PHP (5.2.10) in CentOS’s Testing repository. You could either download each rpm and install, or set up your yum to install from the testing repository.
Open a new file. You can use the Tab key for automatic file name completion, just like at the shell command prompt.
:w filename
Save changes to a file. If you don't specify a file name, Vim saves as the file name you were editing. For saving the file under a different name, specify the file name.
:q
Quit Vim. If you have unsaved changes, Vim refuses to exit.
:q!
Exit Vim without saving changes.
:wq
Write the file and exit.
:x
Almost the same as :wq, write the file and exit if you've made changes to the file. If you haven't made any changes to the file, Vim exits without writing the file.
Moving around in the file
These Vim commands and keys work both in command mode and visual mode.
Vim command
Action
j or Up Arrow
Move the cursor up one line.
k or Down Arrow
Down one line.
h or Left Arrow
Left one character.
l or Right Arrow
Right one character.
e
To the end of a word.
E
To the end of a whitespace-delimited word.
b
To the beginning of a word.
B
To the beginning of a whitespace-delimited word.
0
To the beginning of a line.
^
To the first non-whitespace character of a line.
$
To the end of a line.
H
To the first line of the screen.
M
To the middle line of the screen.
L
To the the last line of the screen.
:n
Jump to line number n. For example, to jump to line 42, you'd type :42
Inserting and overwriting text
Vim command
Action
i
Insert before cursor.
I
Insert to the start of the current line.
a
Append after cursor.
A
Append to the end of the current line.
o
Open a new line below and insert.
O
Open a new line above and insert.
C
Change the rest of the current line.
r
Overwrite one character. After overwriting the single character, go back to command mode.
R
Enter insert mode but replace characters rather than inserting.
The ESC key
Exit insert/overwrite mode and go back to command mode.
Deleting text
Vim command
Action
x
Delete characters under the cursor.
X
Delete characters before the cursor.
dd or :d
Delete the current line.
Entering visual mode
Vim command
Action
v
Start highlighting characters. Use the normal movement keys and commands to select text for highlighting.
V
Start highlighting lines.
The ESC key
Exit visual mode and return to command mode.
Editing blocks of text
Note: the Vim commands marked with (V) work in visual mode, when you've selected some text. The other commands work in the command mode, when you haven't selected any text.
Vim command
Action
~
Change the case of characters. This works both in visual and command mode. In visual mode, change the case of highlighted characters. In command mode, change the case of the character uder cursor.
> (V)
Shift right (indent).
< (V)
Shift left (de-indent).
c (V)
Change the highlighted text.
y (V)
Yank the highlighted text. In Windows terms, "copy the selected text to clipboard."
d (V)
Delete the highlighted text. In Windows terms, "cut the selected text to clipboard."
yy or :y or Y
Yank the current line. You don't need to highlight it first.
dd or :d
Delete the current line. Again, you don't need to highlight it first.
p
Put the text you yanked or deleted. In Windows terms, "paste the contents of the clipboard". Put characters after the cursor. Put lines below the current line.
P
Put characters before the cursor. Put lines above the current line.
Undo and redo
Vim command
Action
u
Undo the last action.
U
Undo all the latest changes that were made to the current line.
Ctrl + r
Redo.
Search
Vim command
Action
/pattern
Search the file for pattern.
n
Scan for next search match in the same direction.
N
Scan for next search match but opposite direction.
Replace
Vim command
Action
:rs/foo/bar/a
Substitute foo with bar. r determines the range and a determines the arguments.
The range (r) can be
nothing
Work on current line only.
number
Work on the line whose number you give.
%
The whole file.
Arguments (a) can be
g
Replace all occurrences in the line. Without this, Vim replaces only the first occurrences in each line.
i
Ignore case for the search pattern.
I
Don't ignore case.
c
Confirm each substitution. You can type y to substitute this match, n to skip this match, a to substitute this and all the remaining matches ("Yes to all"), and q to quit substitution.
Examples
:452s/foo/bar/
Replace the first occurrence of the word foo with bar on line number 452.
:s/foo/bar/g
Replace every occurrence of the word foo with bar on current line.
:%s/foo/bar/g
Replace every occurrence of the word foo with bar in the whole file.
:%s/foo/bar/gi
The same as above, but ignore the case of the pattern you want to substitute. This replaces foo, FOO, Foo, and so on.
:%s/foo/bar/gc
Confirm every substitution.
:%s/foo/bar/c
For each line on the file, replace the first occurrence of foo with bar and confirm every substitution.